前回は、Terraform でネットワークを作りました。今回は、compute のフォルダで、そのネットワークの中に Web サーバーになる Compute を作ります。Compute を作るときに cloud-init で SSH の準備まで済ませ、Cloud Shell から SSH で入れることを確かめます。
今回作るもの
今回は、前回作った公開用サブネットに、Compute を1台作ります。
図1 本検証で Terraform が作る Compute と、cloud-init でしておくこと
| 項目 | 値 | 理由 |
|---|---|---|
| シェイプ | VM.Standard.A1.Flex(1 OCPU、メモリ 6GB) |
Always Free の範囲で使える |
| イメージ | Oracle Linux 9 の最新版 | Terraform で、最新のものを探して使う |
| 置く場所 | 前回作った公開用サブネット | 公開 IP を付け、外から届くようにする |
Always Free の Compute は、テナンシのホームリージョンに作ります。尚、Always Freeのリソースは取り合いになることが多く、作るときに「out of host capacity」のエラーになることがあります。
その場合、しばらく期間を空けてから apply を行なってください。
cloud-init で行うこと
cloud-init は、Compute を作った後、最初に起動したときに渡しておいた設定を実行する仕組みです。今回は、次の回で Ansible が入るための準備を、cloud-init でしておきます。
| すること | 理由 |
|---|---|
専用のユーザー ansible を作り、SSH の公開鍵を置く |
Ansible が、このユーザーで SSH 接続する |
ansible に、パスワードなしの sudo を許す |
Ansible が、サーバーの設定を管理者の権限で変えられるようにする |
時刻帯を日本(Asia/Tokyo)にする |
ログの時刻を読みやすくする |
cloud-init が動くのは、最初の起動のときの1回だけです。Web サーバーのように、後から設定を変え続けるものは、次回 Ansible で作ります。
SSH の鍵を作る
Cloud Shell で、この検証用の SSH の鍵を作ります。
ssh-keygen -t rsa -b 4096 -f ~/.ssh/iac-intro -N ""
~/.ssh/iac-intro(秘密鍵)と ~/.ssh/iac-intro.pub(公開鍵)ができます。-N "" は、鍵にパスフレーズを付けない指定です。この検証では、手順を簡単にするために付けません。秘密鍵は、Cloud Shell の外に出さないようにします。
設定ファイルを書く
作業用のフォルダを作り、その中に移ります。
mkdir -p ~/iac-intro/compute
cd ~/iac-intro/compute
main.tf を書きます。
vi main.tf
terraform {
  required_providers {
    oci = {
      source = "oracle/oci"
    }
  }
}

provider "oci" {
  region = "ap-tokyo-1"
}

variable "compartment_id" {
  type = string
}

variable "subnet_id" {
  type = string
}

variable "ssh_public_key_path" {
  type = string
}

data "oci_identity_availability_domains" "ads" {
  compartment_id = var.compartment_id
}

data "oci_core_images" "ol9" {
  compartment_id           = var.compartment_id
  operating_system         = "Oracle Linux"
  operating_system_version = "9"
  shape                    = "VM.Standard.A1.Flex"
  sort_by                  = "TIMECREATED"
  sort_order               = "DESC"
}

locals {
  ssh_public_key = trimspace(file(pathexpand(var.ssh_public_key_path)))

  cloud_init = <<-EOT
    #cloud-config
    timezone: Asia/Tokyo
    users:
      - default
      - name: ansible
        sudo: "ALL=(ALL) NOPASSWD:ALL"
        shell: /bin/bash
        ssh_authorized_keys:
          - ${local.ssh_public_key}
  EOT
}

resource "oci_core_instance" "web" {
  availability_domain = data.oci_identity_availability_domains.ads.availability_domains[0].name
  compartment_id      = var.compartment_id
  display_name        = "iac-intro-web"
  shape               = "VM.Standard.A1.Flex"

  shape_config {
    ocpus         = 1
    memory_in_gbs = 6
  }

  source_details {
    source_type = "image"
    source_id   = data.oci_core_images.ol9.images[0].id
  }

  create_vnic_details {
    subnet_id        = var.subnet_id
    assign_public_ip = true
  }

  metadata = {
    ssh_authorized_keys = local.ssh_public_key
    user_data           = base64encode(local.cloud_init)
  }
}

output "public_ip" {
  value = oci_core_instance.web.public_ip
}
Computeで新たに扱う定義が3つあります。
| ブロック | 書くもの | 今回の使い方 |
|---|---|---|
data |
OCI にすでにあるものを読み取る(作らない) | 可用性ドメインの名前と、Oracle Linux 9 の最新のイメージを探す |
locals |
設定ファイルの中で使い回す値 | 公開鍵の中身と、cloud-init に渡す設定 |
metadata |
インスタンスを作成する際の、スクリプト、認証キーを指定 | ssh_authorized_keys は既定ユーザー opc で使う。user_data は cloud-init の設定を base64 に変換して渡す |
terraform.tfvars
compartment_id      = "ocid1.compartment.oc1..(5回目で控えた OCID)"
subnet_id           = "ocid1.subnet.oc1..(前回控えた subnet_id)"
ssh_public_key_path = "~/.ssh/iac-intro.pub"
init・plan・apply
terraform init
Initializing the backend...

Initializing provider plugins...
- Finding latest version of oracle/oci...
- Installing oracle/oci v9.13.0...
- Installed oracle/oci v9.13.0 (signed by a HashiCorp partner, key ID 1533A49284137CEB)

Partner and community providers are signed by their developers.
If you'd like to know more about provider signing, you can read about it here:
https://www.terraform.io/docs/cli/plugins/signing.html

Terraform has created a lock file .terraform.lock.hcl to record the provider
selections it made above. Include this file in your version control repository
so that Terraform can guarantee to make the same selections by default when
you run "terraform init" in the future.

Terraform has been successfully initialized!

You may now begin working with Terraform. Try running "terraform plan" to see
any changes that are required for your infrastructure. All Terraform commands
should now work.

If you ever set or change modules or backend configuration for Terraform,
rerun this command to reinitialize your working directory. If you forget, other
commands will detect it and remind you to do so if necessary.
terraform plan
data.oci_core_images.ol9: Reading...
data.oci_identity_availability_domains.ads: Reading...
data.oci_identity_availability_domains.ads: Read complete after 0s [id=IdentityAvailabilityDomainsDataSource-3149372725]
data.oci_core_images.ol9: Read complete after 0s [id=CoreImagesDataSource-1379663440]

Terraform used the selected providers to generate the following execution plan. Resource actions are indicated with the following symbols:
  + create

Terraform will perform the following actions:

  # oci_core_instance.web will be created
  + resource "oci_core_instance" "web" {
(中略)
    }

Plan: 1 to add, 0 to change, 0 to destroy.

Changes to Outputs:
  + public_ip = (known after apply)
plan では、data の読み取りが先に行われ、そのあとに作るものが表示されます。作るのは Compute の1つなので、最後の行は 1 to add となります。前回作ったネットワークは、別のフォルダの state にあるので、この plan には出てきません。
terraform apply
data.oci_core_images.ol9: Reading...
data.oci_identity_availability_domains.ads: Reading...
data.oci_identity_availability_domains.ads: Read complete after 0s [id=IdentityAvailabilityDomainsDataSource-3149372725]
data.oci_core_images.ol9: Read complete after 0s [id=CoreImagesDataSource-1379663440]

Terraform used the selected providers to generate the following execution plan. Resource actions are indicated with the following symbols:
  + create

Terraform will perform the following actions:

  # oci_core_instance.web will be created
  + resource "oci_core_instance" "web" {
(中略)
    }

Plan: 1 to add, 0 to change, 0 to destroy.

Changes to Outputs:
  + public_ip = (known after apply)

Do you want to perform these actions?
  Terraform will perform the actions described above.
  Only 'yes' will be accepted to approve.

  Enter a value: yes

oci_core_instance.web: Creating...
oci_core_instance.web: Still creating... [10s elapsed]
oci_core_instance.web: Still creating... [20s elapsed]
oci_core_instance.web: Still creating... [30s elapsed]
oci_core_instance.web: Creation complete after 34s [id=ocid1.instance.oc1.ap-tokyo-1.xxxx]

Apply complete! Resources: 1 added, 0 changed, 0 destroyed.

Outputs:

public_ip = "xxx.xxx.xxx.xxx"
Compute ができるまで、数分かかります。終わると、output に書いた public_ip が表示されます。
コンソールで Compute のインスタンスの一覧を開くと、iac-intro-web が「実行中」になっています。
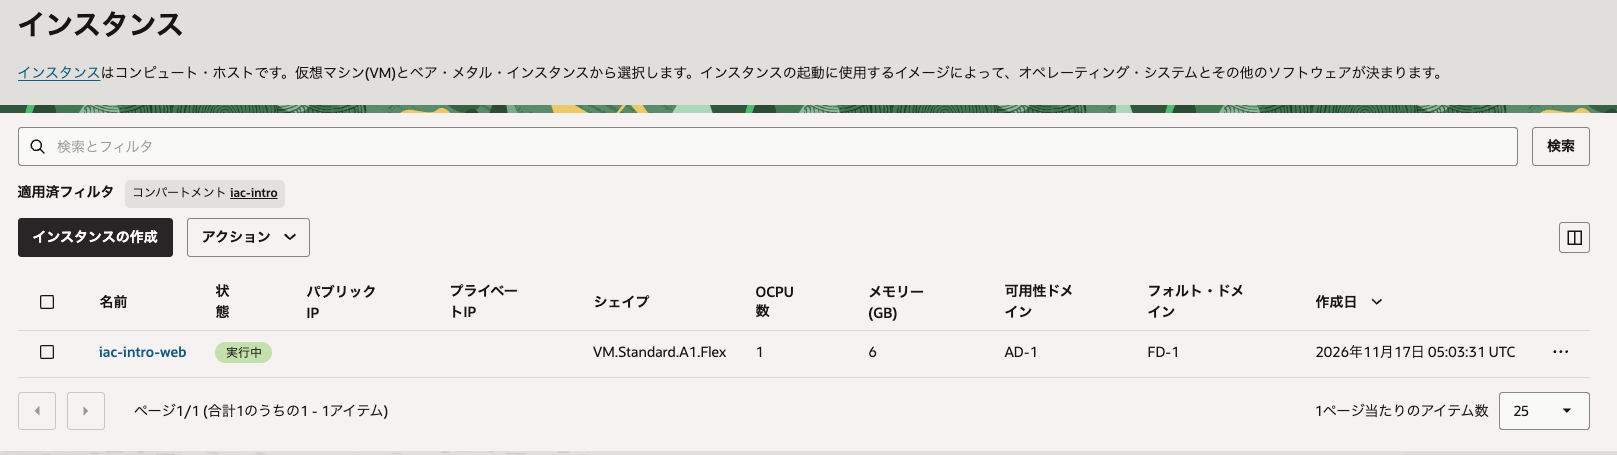
図2 インスタンスの一覧(iac-intro-web が実行中)
SSH で入って確かめる
前回のセキュリティ・リストは、ssh_source_cidr に入れた接続元からの SSH だけを許しています。Cloud Shell から入るには、Cloud Shell がインターネットに出るときの IP を、この接続元にしておきます。
curl -s https://ifconfig.me
表示された IP に /32 を付けて、前回の vcn のフォルダの terraform.tfvars にある ssh_source_cidr に入れます。そのうえで、vcn のフォルダで terraform apply をやり直します。変わるのは、セキュリティ・リストの SSH の許可の1件だけです。
ssh_source_cidr = "xxx.xxx.xxx.xxx/32"
Cloud Shell の IP は、セッションによって変わることがあります。SSH の応答が返らないときは、IP を調べ直してください。
Cloud Shell から、cloud-init で作ったユーザー ansible で入ります。<公開 IP> には、apply で表示された public_ip を入れます。
ssh -i ~/.ssh/iac-intro ansible@<公開 IP>
初めて接続するときは、接続先を信用するかを聞かれます。yes と入れます。
入れたら、cloud-init が終わっていることを確かめます。
cloud-init status
status: done
status: done と表示されれば、cloud-init の設定はすべて終わっています。時刻帯と sudo も確かめます。
timedatectl | grep "Time zone"
Time zone: Asia/Tokyo (JST, +0900)
sudo -n true && echo "sudo OK"
sudo OK
Asia/Tokyo と sudo OK が表示されれば、Ansible が入るための準備はできています。exit で Cloud Shell に戻ります。
次回
次回は、今回作った Compute に、Ansible で Web サーバーに必要なものを入れ、インターネットからページが見えるところまで進めます。
この記事の手順は、OCI の公式ドキュメント(Always Free のリソース)と、OCI の Terraform プロバイダの公式ドキュメントを基にしています。