前回は、作業用のコンパートメント iac-intro を作り、権限を整えました。今回から、Terraform でリソースを作ります。最初に、この検証で Terraform が作るものの全体と、設定ファイルを置くフォルダの分け方を示し、そのうちネットワークの部分を作ります。
この検証で Terraform が作るもの
この検証では、インターネットから見られる Web サーバーを1台作ります。Terraform で作るのは、次の構成です。
図1 本検証で Terraform が作るネットワーク
| リソース | 役目 | 作る回 |
|---|---|---|
| VCN | ネットワークの入れ物 | 今回 |
| インターネットゲートウェイ | VCN とインターネットの出入口 | 今回 |
| ルート表 | VCN の外へ向かう通信を、インターネットゲートウェイへ送る | 今回 |
| セキュリティ・リスト | サブネットに出入りしてよい通信を決める | 今回 |
| 公開用サブネット | Web サーバーを置く場所 | 今回 |
| Compute | Web サーバーになるインスタンス | 次回 |
今回はネットワークを作り、次回、その中に Compute を置きます。
設定ファイルを置くディレクトリ構造
本検証で使用する設定ファイルは、以下のディレクトリ構造にネットワークとサーバーで別のフォルダに置きます。
~/iac-intro/
├── vcn/
│   ├── main.tf
│   └── terraform.tfvars
└── compute/
    ├── main.tf
    └── terraform.tfvars
Terraform は、init や apply を実行したフォルダごとに、state を1つ持ちます。フォルダを分けると、サーバーを作り直すときに、ネットワークに触れずに済みます。
Terraform では、このように init や apply を実行するフォルダを「ルートモジュール」と呼びます。
2つのフォルダは、値を1つだけ受け渡します。vcn で作ったサブネットの OCID を、compute の terraform.tfvars に書き写します。前回、コンパートメントの OCID を控えて使うと説明したのと同じ流れです。
まず VCN だけを作る
Cloud Shell のネットワークを確かめる
Terraform は、init のときにプロバイダをインターネットから取ってきます。Cloud Shell を開いたら、画面上部の「ネットワーク」のメニューを開き、「パブリック・ネットワーク」を選びます。既定の「OCIサービス・ネットワーク」は OCI のサービスにしかつながらないため、init がプロバイダを取ってこられずに止まります。
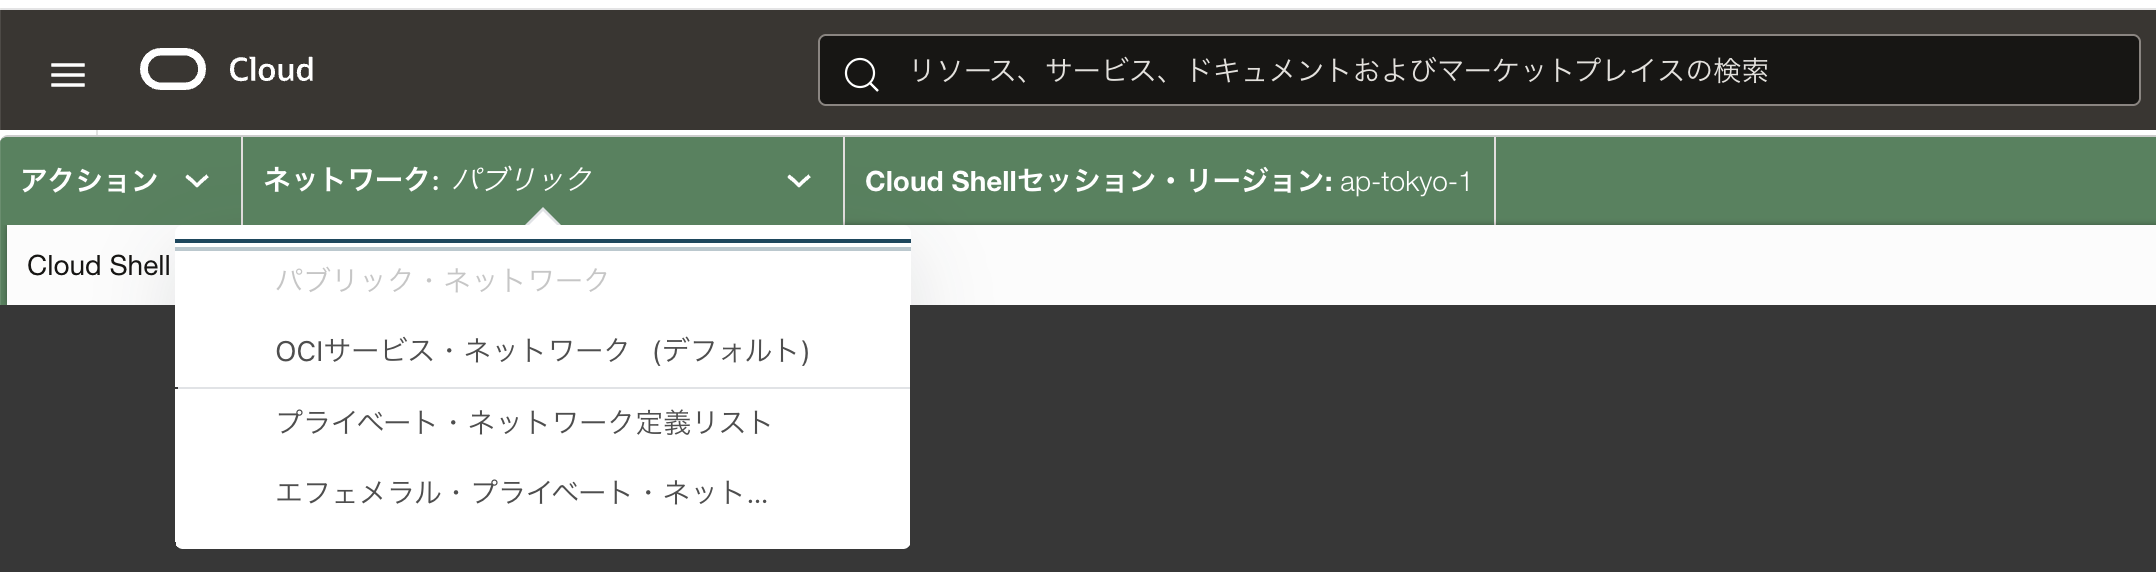
図2 Cloud Shell のネットワークのメニュー
メニューの表示が「ネットワーク: パブリック」になっていれば、準備はできています。
設定ファイルを書く
作業用のフォルダを作り、その中に移ります。
mkdir -p ~/iac-intro/vcn
cd ~/iac-intro/vcn
Cloud Shell のホームディレクトリ(~)の中身は、次に開いたときも残ります。
1つ目は、使うプロバイダと、作るリソースを書く main.tf です。
vi main.tf
terraform {
  required_providers {
    oci = {
      source = "oracle/oci"
    }
  }
}

provider "oci" {
  region = "ap-tokyo-1"
}

variable "compartment_id" {
  type = string
}

resource "oci_core_vcn" "main" {
  compartment_id = var.compartment_id
  cidr_blocks    = ["10.0.0.0/16"]
  display_name   = "iac-intro-vcn"
}

output "vcn_id" {
  value = oci_core_vcn.main.id
}
3回目で見た5つのブロックのうち、terraform、provider、variable、resource、output をすべて使っています。
2つ目は、variable に渡す値を書く terraform.tfvars です。前回控えたコンパートメントの OCID を入れます。
compartment_id = "ocid1.compartment.oc1..(前回控えた OCID)"
terraform.tfvars という名前のファイルは、Terraform が自動で読み込みます。OCID を main.tf に直接書かず、別のファイルに分けておくと、同じ main.tf を別のコンパートメントでも使えます。
プロビジョニング
terraform init
terraform init
init は、terraform ブロックに書いたプロバイダの設定に必要なプラグインやモジュールをダウンロードし、Terraform環境を初期化を行います。
terraform validate
terraform validate
Success! The configuration is valid.
.tfファイルの構文と設定の妥当性をチェックをしてくれます。書き方に誤りがなければ、Success! と表示されます。
terraform plan
terraform plan
plan は、作成、変更、削除する前に実行計画を確認できます。この時点ではまだ環境に対し何も実行されません。
設定ファイルと今の状態を比べて、何をするかを表示します。行頭の + は「作る」という意味です。今回は VCN を1つ作るので、最後の行は 1 to add となります。
Terraform used the selected providers to generate the following execution plan. Resource actions are indicated with the following symbols:
  + create

Terraform will perform the following actions:

  # oci_core_vcn.main will be created
  + resource "oci_core_vcn" "main" {
      + byoipv6cidr_blocks               = (known after apply)
      + cidr_block                       = (known after apply)
      + cidr_blocks                      = [
          + "10.0.0.0/16",
        ]
      + compartment_id                   = "ocid1.compartment.oc1..(伏せています)"
      + default_dhcp_options_id          = (known after apply)
      + default_route_table_id           = (known after apply)
      + default_security_list_id         = (known after apply)
      + defined_tags                     = (known after apply)
      + display_name                     = "iac-intro-vcn"
      + dns_label                        = (known after apply)
      + freeform_tags                    = (known after apply)
      + id                               = (known after apply)
      + ipv6cidr_blocks                  = (known after apply)
      + ipv6private_cidr_blocks          = (known after apply)
      + is_ipv6enabled                   = (known after apply)
      + is_oracle_gua_allocation_enabled = (known after apply)
      + security_attributes              = (known after apply)
      + state                            = (known after apply)
      + time_created                     = (known after apply)
      + vcn_domain_name                  = (known after apply)
    }

Plan: 1 to add, 0 to change, 0 to destroy.

Changes to Outputs:
  + vcn_id = (known after apply)

Note: You didn't use the -out option to save this plan, so Terraform can't guarantee to take exactly these actions if you run "terraform apply" now.
この時点では、コンソールで VCN の一覧を開いても、コンパートメント iac-intro には VCN がありません。
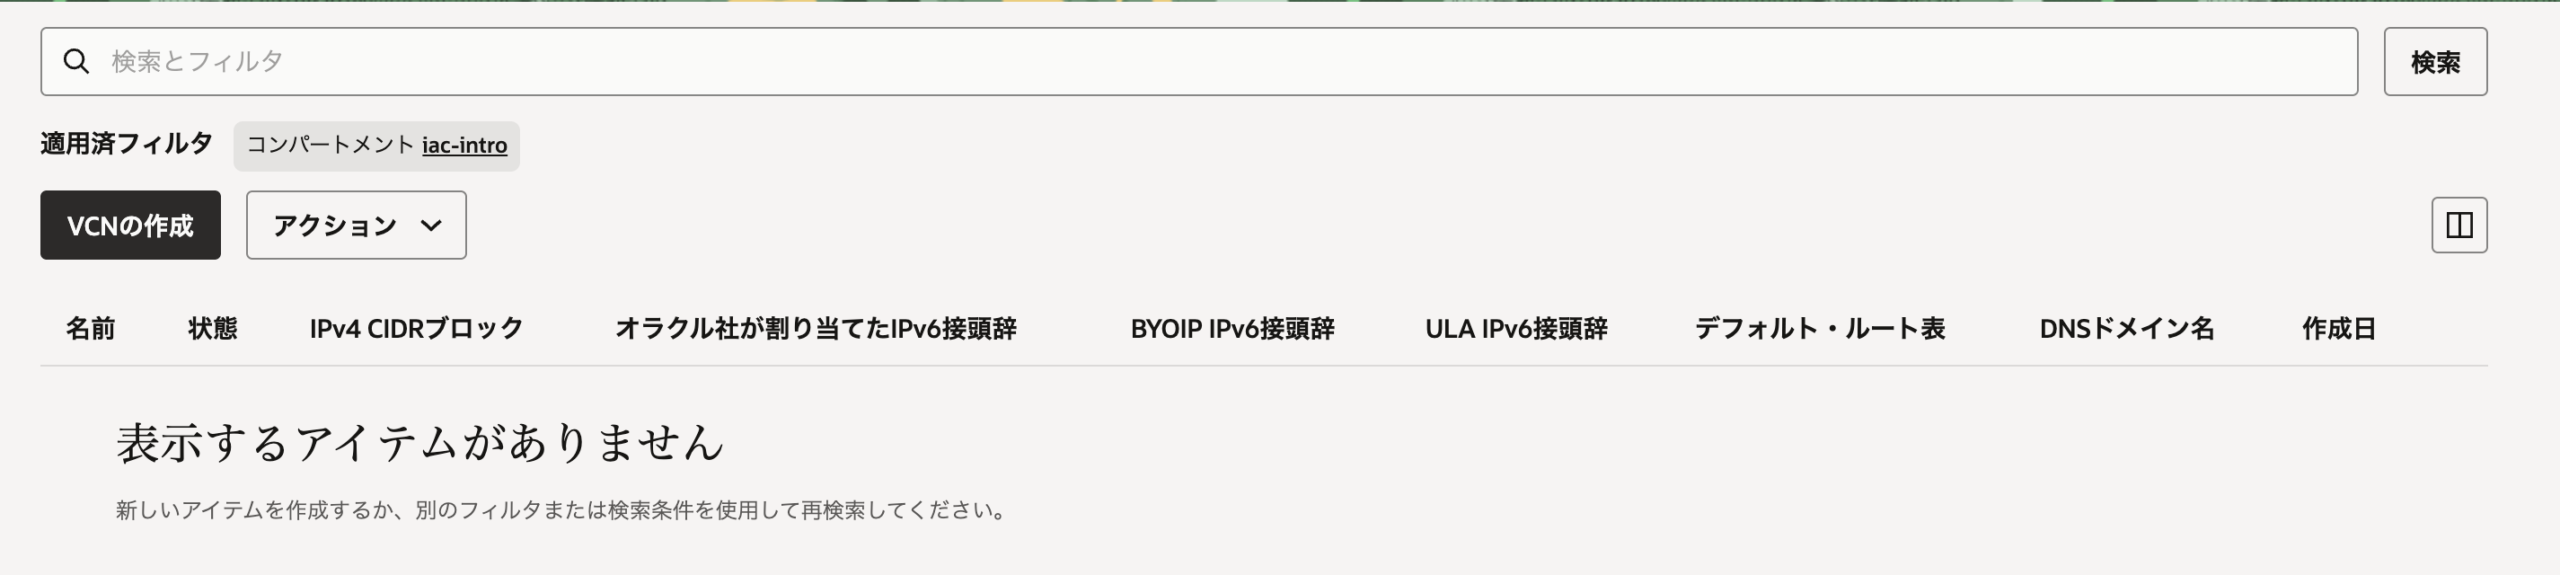
図3 apply の前の VCN の一覧
terraform apply
terraform apply
実際にリソースの追加・更新・削除が実行されます。apply は、もう一度 plan と同じ内容を表示し、本当に実行するかを聞いてきます。
yes と入れることで、実際の環境に対しリソースの作成を開始します。
Terraform used the selected providers to generate the following execution plan. Resource actions are indicated with the following symbols:
  + create

Terraform will perform the following actions:

  # oci_core_vcn.main will be created
  + resource "oci_core_vcn" "main" {
      + byoipv6cidr_blocks               = (known after apply)
      + cidr_block                       = (known after apply)
      + cidr_blocks                      = [
          + "10.0.0.0/16",
        ]
      + compartment_id                   = "ocid1.compartment.oc1..(伏せています)"
      + default_dhcp_options_id          = (known after apply)
      + default_route_table_id           = (known after apply)
      + default_security_list_id         = (known after apply)
      + defined_tags                     = (known after apply)
      + display_name                     = "iac-intro-vcn"
      + dns_label                        = (known after apply)
      + freeform_tags                    = (known after apply)
      + id                               = (known after apply)
      + ipv6cidr_blocks                  = (known after apply)
      + ipv6private_cidr_blocks          = (known after apply)
      + is_ipv6enabled                   = (known after apply)
      + is_oracle_gua_allocation_enabled = (known after apply)
      + security_attributes              = (known after apply)
      + state                            = (known after apply)
      + time_created                     = (known after apply)
      + vcn_domain_name                  = (known after apply)
    }

Plan: 1 to add, 0 to change, 0 to destroy.

Changes to Outputs:
  + vcn_id = (known after apply)

Do you want to perform these actions?
  Terraform will perform the actions described above.
  Only 'yes' will be accepted to approve.

  Enter a value: yes

oci_core_vcn.main: Creating...
oci_core_vcn.main: Creation complete after 1s [id=ocid1.vcn.oc1.ap-tokyo-1.(伏せています)]

Apply complete! Resources: 1 added, 0 changed, 0 destroyed.

Outputs:

vcn_id = "ocid1.vcn.oc1.ap-tokyo-1.(伏せています)"
コンソールで VCN の一覧を開くと、iac-intro-vcn ができていて、状態は「使用可能」です。
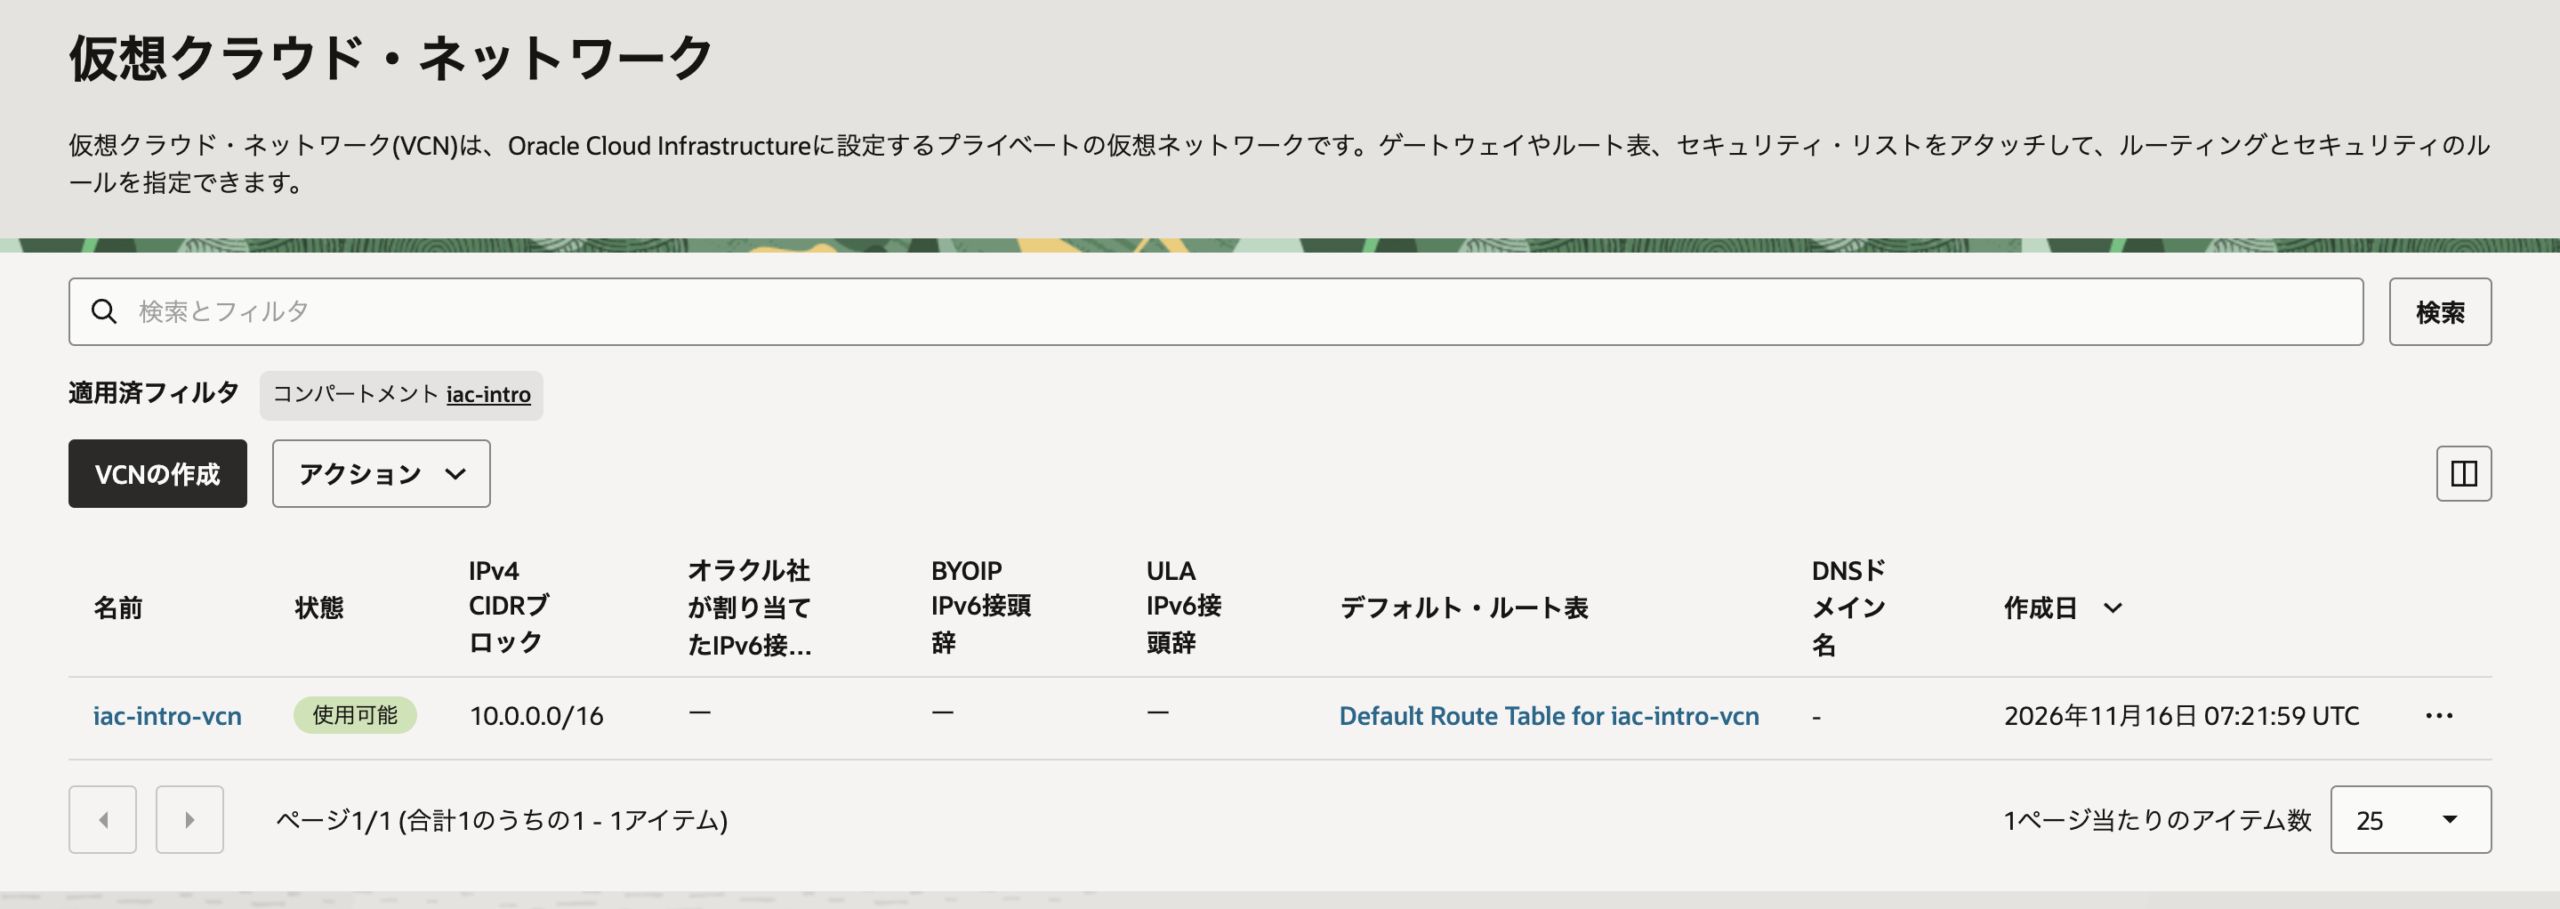
図4 apply の後の VCN の一覧
フォルダには、terraform.tfstate ができています。2回目で説明した state で、Terraform が作ったリソースの記録です。
作成したVCNを仕上げる
VCN ができたら、同じ main.tf の最後に、残りの4つのリソースを書き足し、先程のVCNとの通信設定を行います。
variable "ssh_source_cidr" {
  type = string
}

resource "oci_core_internet_gateway" "main" {
  compartment_id = var.compartment_id
  vcn_id         = oci_core_vcn.main.id
  display_name   = "iac-intro-igw"
}

resource "oci_core_route_table" "public" {
  compartment_id = var.compartment_id
  vcn_id         = oci_core_vcn.main.id
  display_name   = "iac-intro-public-rt"

  route_rules {
    destination       = "0.0.0.0/0"
    destination_type  = "CIDR_BLOCK"
    network_entity_id = oci_core_internet_gateway.main.id
  }
}

resource "oci_core_security_list" "public" {
  compartment_id = var.compartment_id
  vcn_id         = oci_core_vcn.main.id
  display_name   = "iac-intro-public-sl"

  egress_security_rules {
    protocol    = "all"
    destination = "0.0.0.0/0"
  }

  ingress_security_rules {
    protocol = "6"
    source   = var.ssh_source_cidr
    tcp_options {
      min = 22
      max = 22
    }
  }

  ingress_security_rules {
    protocol = "6"
    source   = "0.0.0.0/0"
    tcp_options {
      min = 80
      max = 80
    }
  }
}

resource "oci_core_subnet" "public" {
  compartment_id    = var.compartment_id
  vcn_id            = oci_core_vcn.main.id
  cidr_block        = "10.0.1.0/24"
  display_name      = "iac-intro-public-subnet"
  route_table_id    = oci_core_route_table.public.id
  security_list_ids = [oci_core_security_list.public.id]
}

output "subnet_id" {
  value = oci_core_subnet.public.id
}
| リソース | 書いたこと |
|---|---|
oci_core_internet_gateway |
VCN に、インターネットとの出入口を付ける |
oci_core_route_table |
宛先が VCN の外(0.0.0.0/0)の通信を、インターネットゲートウェイへ送る |
oci_core_security_list |
外へ出る通信はすべて許す。入ってくる通信は、SSH(22番)を決めた接続元から、HTTP(80番)をどこからでも許す |
oci_core_subnet |
VCN の中に 10.0.1.0/24 のサブネットを作り、上のルート表とセキュリティ・リストを使う |
protocol = "6" は TCP を表します。OCI のセキュリティ・リストでは、プロトコルを番号で書きます。
VCN を作ると、OCI は既定のセキュリティ・リストも自動で作ります。既定のものは、SSH をどこからでも受け付ける設定です。この検証では、既定のものを使わず、許可する通信をすべてコードに書きます。
terraform.tfvars には、SSH を許す接続元を1行足します。接続元は CIDR 表記で書きます。1つの IP アドレスだけを許すときは、末尾に /32 を付けます。
compartment_id  = "ocid1.compartment.oc1..(前回控えた OCID)"
ssh_source_cidr = "(SSH を許す接続元の IP アドレス)/32"
書き足したら、plan を実行します。
terraform plan
oci_core_vcn.main: Refreshing state... [id=ocid1.vcn.oc1.ap-tokyo-1.(伏せています)]

Terraform used the selected providers to generate the following execution plan. Resource actions are indicated with the following symbols:
  + create

Terraform will perform the following actions:

  # oci_core_internet_gateway.main will be created
  + resource "oci_core_internet_gateway" "main" {
      + compartment_id = "ocid1.compartment.oc1..(伏せています)"
      + defined_tags   = (known after apply)
      + display_name   = "iac-intro-igw"
      + enabled        = true
      + freeform_tags  = (known after apply)
      + id             = (known after apply)
      + route_table_id = (known after apply)
      + state          = (known after apply)
      + time_created   = (known after apply)
      + vcn_id         = "ocid1.vcn.oc1.ap-tokyo-1.(伏せています)"
    }

  # oci_core_route_table.public will be created
  + resource "oci_core_route_table" "public" {
      + compartment_id = "ocid1.compartment.oc1..(伏せています)"
      + defined_tags   = (known after apply)
      + display_name   = "iac-intro-public-rt"
      + freeform_tags  = (known after apply)
      + id             = (known after apply)
      + state          = (known after apply)
      + time_created   = (known after apply)
      + vcn_id         = "ocid1.vcn.oc1.ap-tokyo-1.(伏せています)"

      + route_rules {
          + cidr_block        = (known after apply)
          + description       = (known after apply)
          + destination       = "0.0.0.0/0"
          + destination_type  = "CIDR_BLOCK"
          + network_entity_id = (known after apply)
          + route_type        = (known after apply)
        }
    }

  (中略:oci_core_security_list.public の前半)

      + ingress_security_rules {
          + description = (known after apply)
          + protocol    = "6"
          + source      = "(伏せています)"
          + source_type = (known after apply)
          + stateless   = false

          + tcp_options {
              + max = 22
              + min = 22
            }
        }
    }

  # oci_core_subnet.public will be created
  + resource "oci_core_subnet" "public" {
      + availability_domain        = (known after apply)
      + cidr_block                 = "10.0.1.0/24"
      + compartment_id             = "ocid1.compartment.oc1..(伏せています)"
      + defined_tags               = (known after apply)
      + dhcp_options_id            = (known after apply)
      + display_name               = "iac-intro-public-subnet"
      + dns_label                  = (known after apply)
      + freeform_tags              = (known after apply)
      + id                         = (known after apply)
      + ipv4cidr_blocks            = (known after apply)
      + ipv6cidr_block             = (known after apply)
      + ipv6cidr_blocks            = (known after apply)
      + ipv6virtual_router_ip      = (known after apply)
      + prohibit_internet_ingress  = (known after apply)
      + prohibit_public_ip_on_vnic = (known after apply)
      + route_table_id             = (known after apply)
      + security_list_ids          = (known after apply)
      + state                      = (known after apply)
      + subnet_domain_name         = (known after apply)
      + time_created               = (known after apply)
      + vcn_id                     = "ocid1.vcn.oc1.ap-tokyo-1.(伏せています)"
      + virtual_router_ip          = (known after apply)
      + virtual_router_mac         = (known after apply)
    }

Plan: 4 to add, 0 to change, 0 to destroy.

Changes to Outputs:
  + subnet_id = (known after apply)
行頭に + が付くのは、書き足した4つだけです。すでにある VCN は、作り直されも、変えられもしません。最後の行は 4 to add, 0 to change, 0 to destroy となります。Terraform は、設定ファイルと state を比べて、違う所だけを直します。
作る順番も書いていません。ルート表はインターネットゲートウェイを、サブネットはルート表とセキュリティ・リストを参照しているので、Terraform は参照されるものから先に作ります。
terraform apply
oci_core_vcn.main: Refreshing state... [id=ocid1.vcn.oc1.ap-tokyo-1.(伏せています)]
oci_core_internet_gateway.main: Refreshing state... [id=ocid1.internetgateway.oc1.ap-tokyo-1.(伏せています)]
oci_core_route_table.public: Refreshing state... [id=ocid1.routetable.oc1.ap-tokyo-1.(伏せています)]

Terraform used the selected providers to generate the following execution plan. Resource actions are indicated with the following symbols:
  + create

Terraform will perform the following actions:

  # oci_core_security_list.public will be created
  + resource "oci_core_security_list" "public" {
      + compartment_id = "ocid1.compartment.oc1..(伏せています)"
      + defined_tags   = (known after apply)
      + display_name   = "iac-intro-public-sl"
      + freeform_tags  = (known after apply)
      + id             = (known after apply)
      + state          = (known after apply)
      + time_created   = (known after apply)
      + vcn_id         = "ocid1.vcn.oc1.ap-tokyo-1.(伏せています)"

      + egress_security_rules {
          + description      = (known after apply)

  (中略)

Plan: 2 to add, 0 to change, 0 to destroy.

Changes to Outputs:
  + subnet_id = (known after apply)

Do you want to perform these actions?
  Terraform will perform the actions described above.
  Only 'yes' will be accepted to approve.

  Enter a value: yes

oci_core_security_list.public: Creating...
oci_core_security_list.public: Creation complete after 0s [id=ocid1.securitylist.oc1.ap-tokyo-1.(伏せています)]
oci_core_subnet.public: Creating...
oci_core_subnet.public: Creation complete after 2s [id=ocid1.subnet.oc1.ap-tokyo-1.(伏せています)]

Apply complete! Resources: 2 added, 0 changed, 0 destroyed.

Outputs:

subnet_id = "ocid1.subnet.oc1.ap-tokyo-1.(伏せています)"
vcn_id = "ocid1.vcn.oc1.ap-tokyo-1.(伏せています)"
実行が終わると、output に書いた vcn_id と subnet_id が表示されます。subnet_id は、次回 compute のフォルダで使うので控えておきます。
追加した設定状態の確認
インターネット・ゲートウェイ
VCN の「ゲートウェイ」タブを開くと、iac-intro-igw ができていて、状態は「使用可能」です。
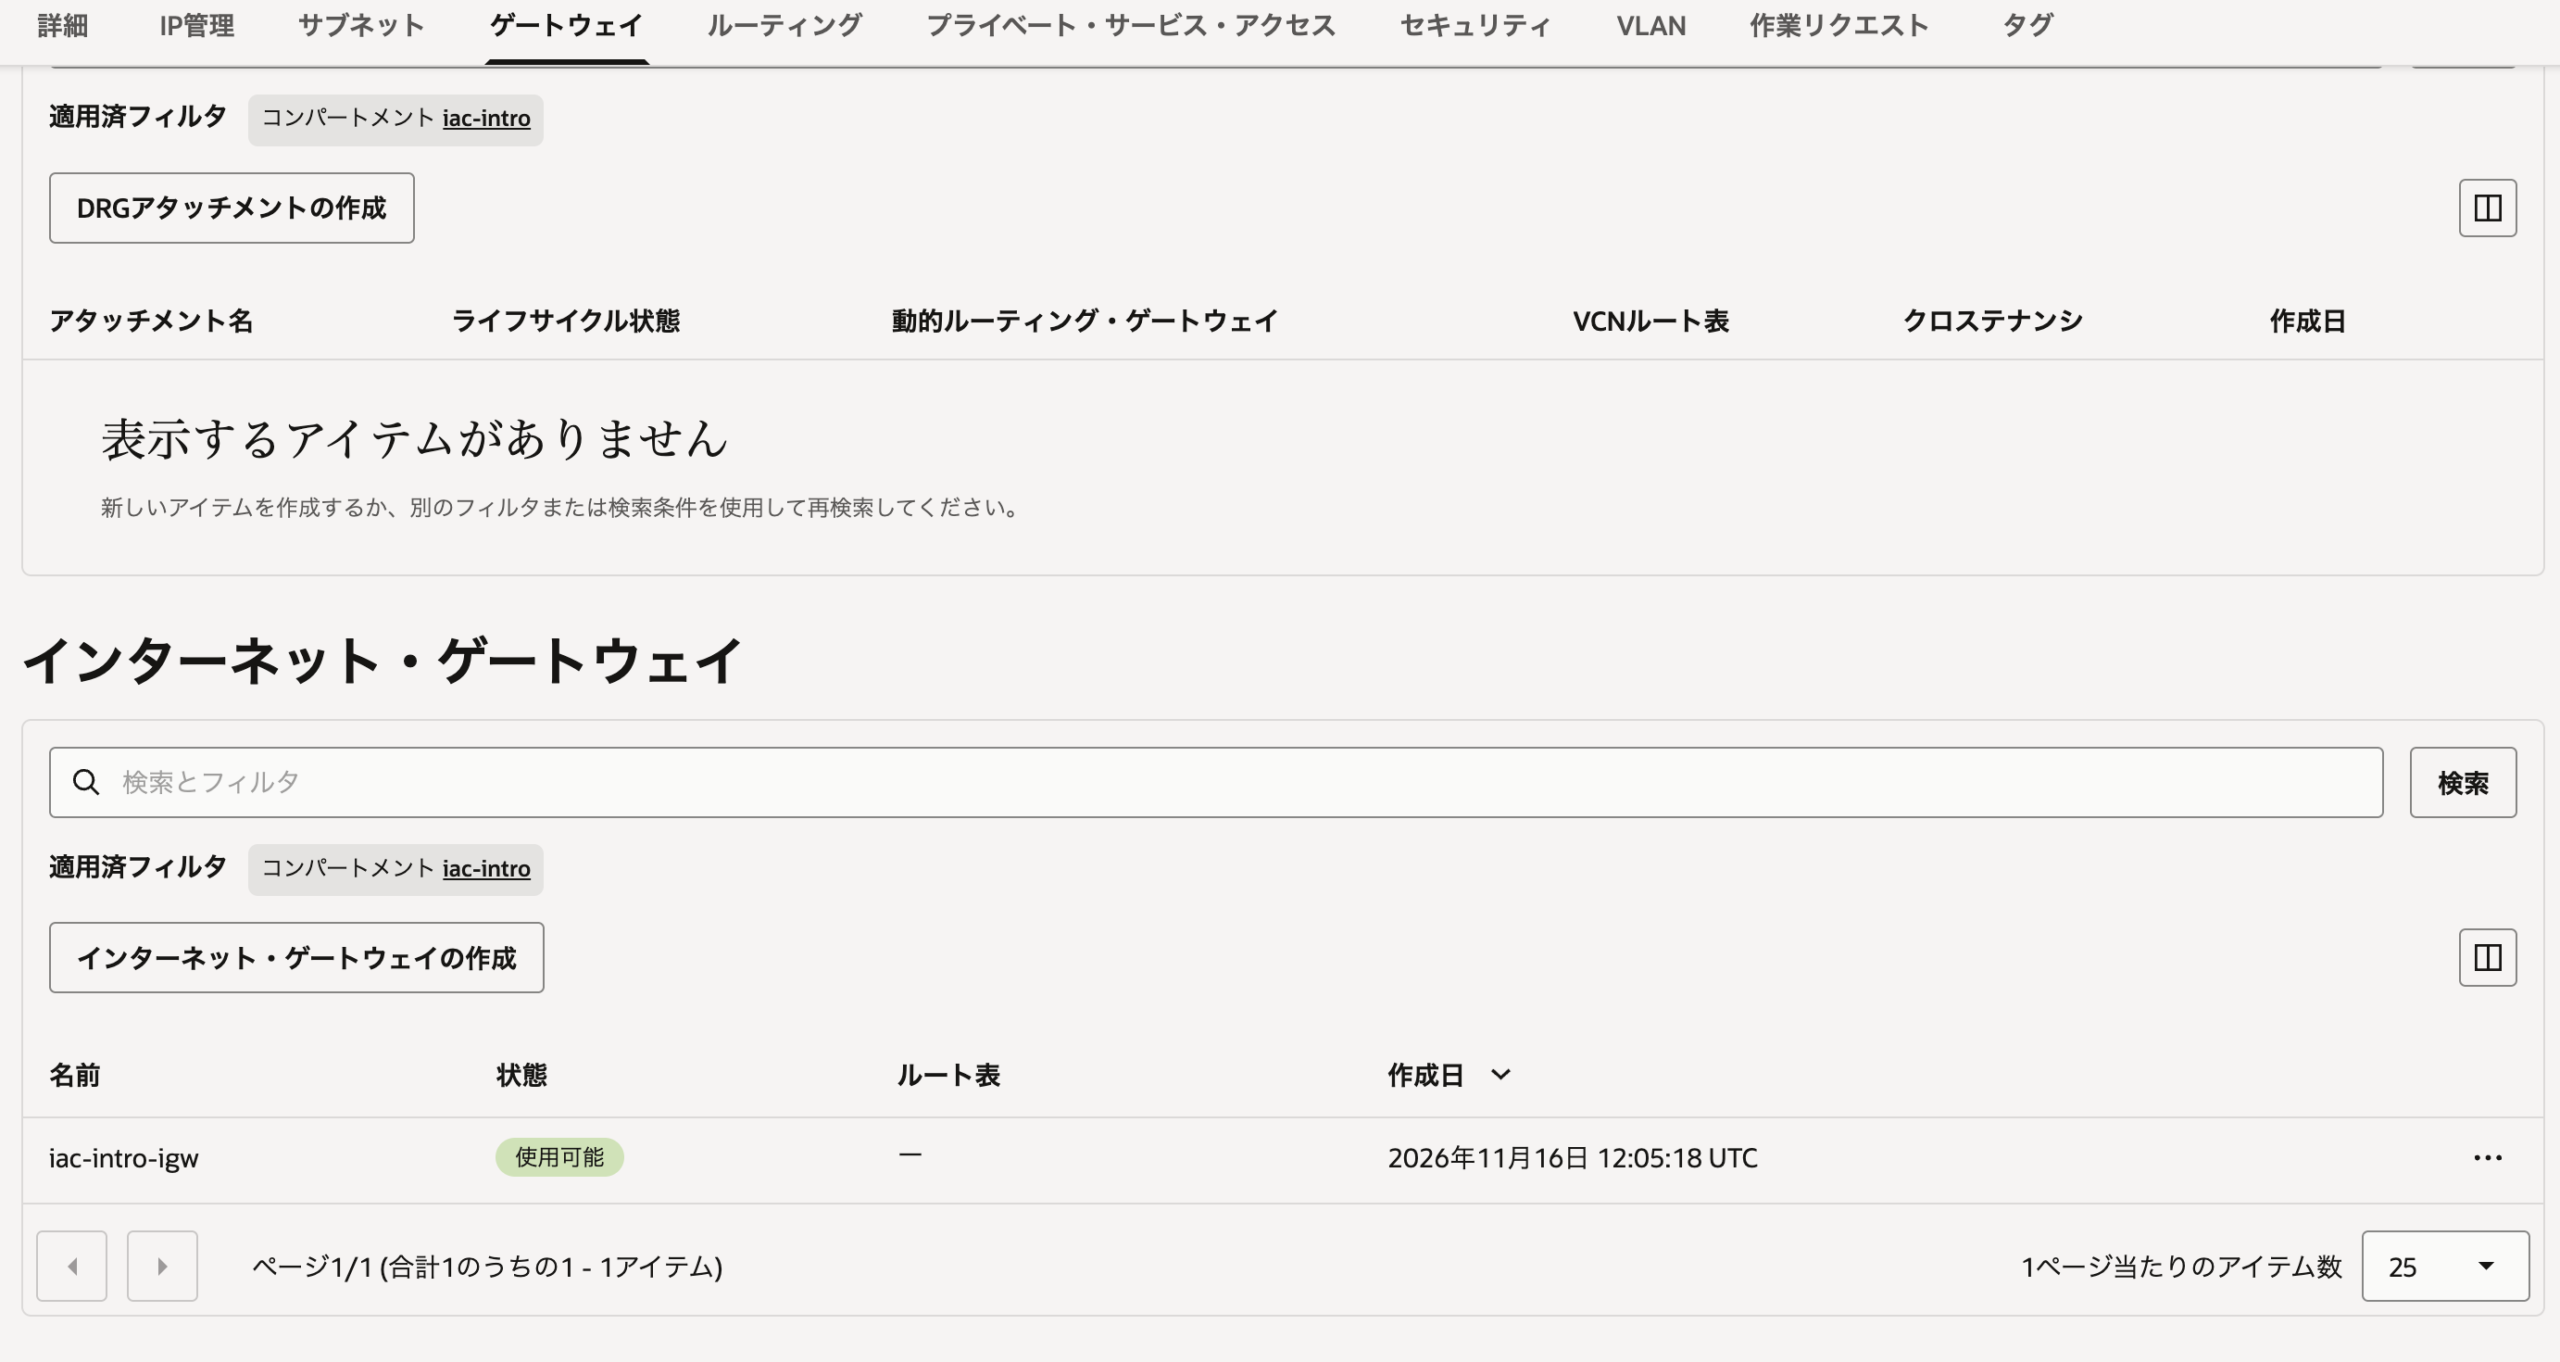
図5 インターネット・ゲートウェイの一覧
ルーティング
ルート表 iac-intro-public-rt の「ルート・ルール」タブを開くと、宛先が 0.0.0.0/0 の通信をインターネット・ゲートウェイ iac-intro-igw へ送るルールができています。
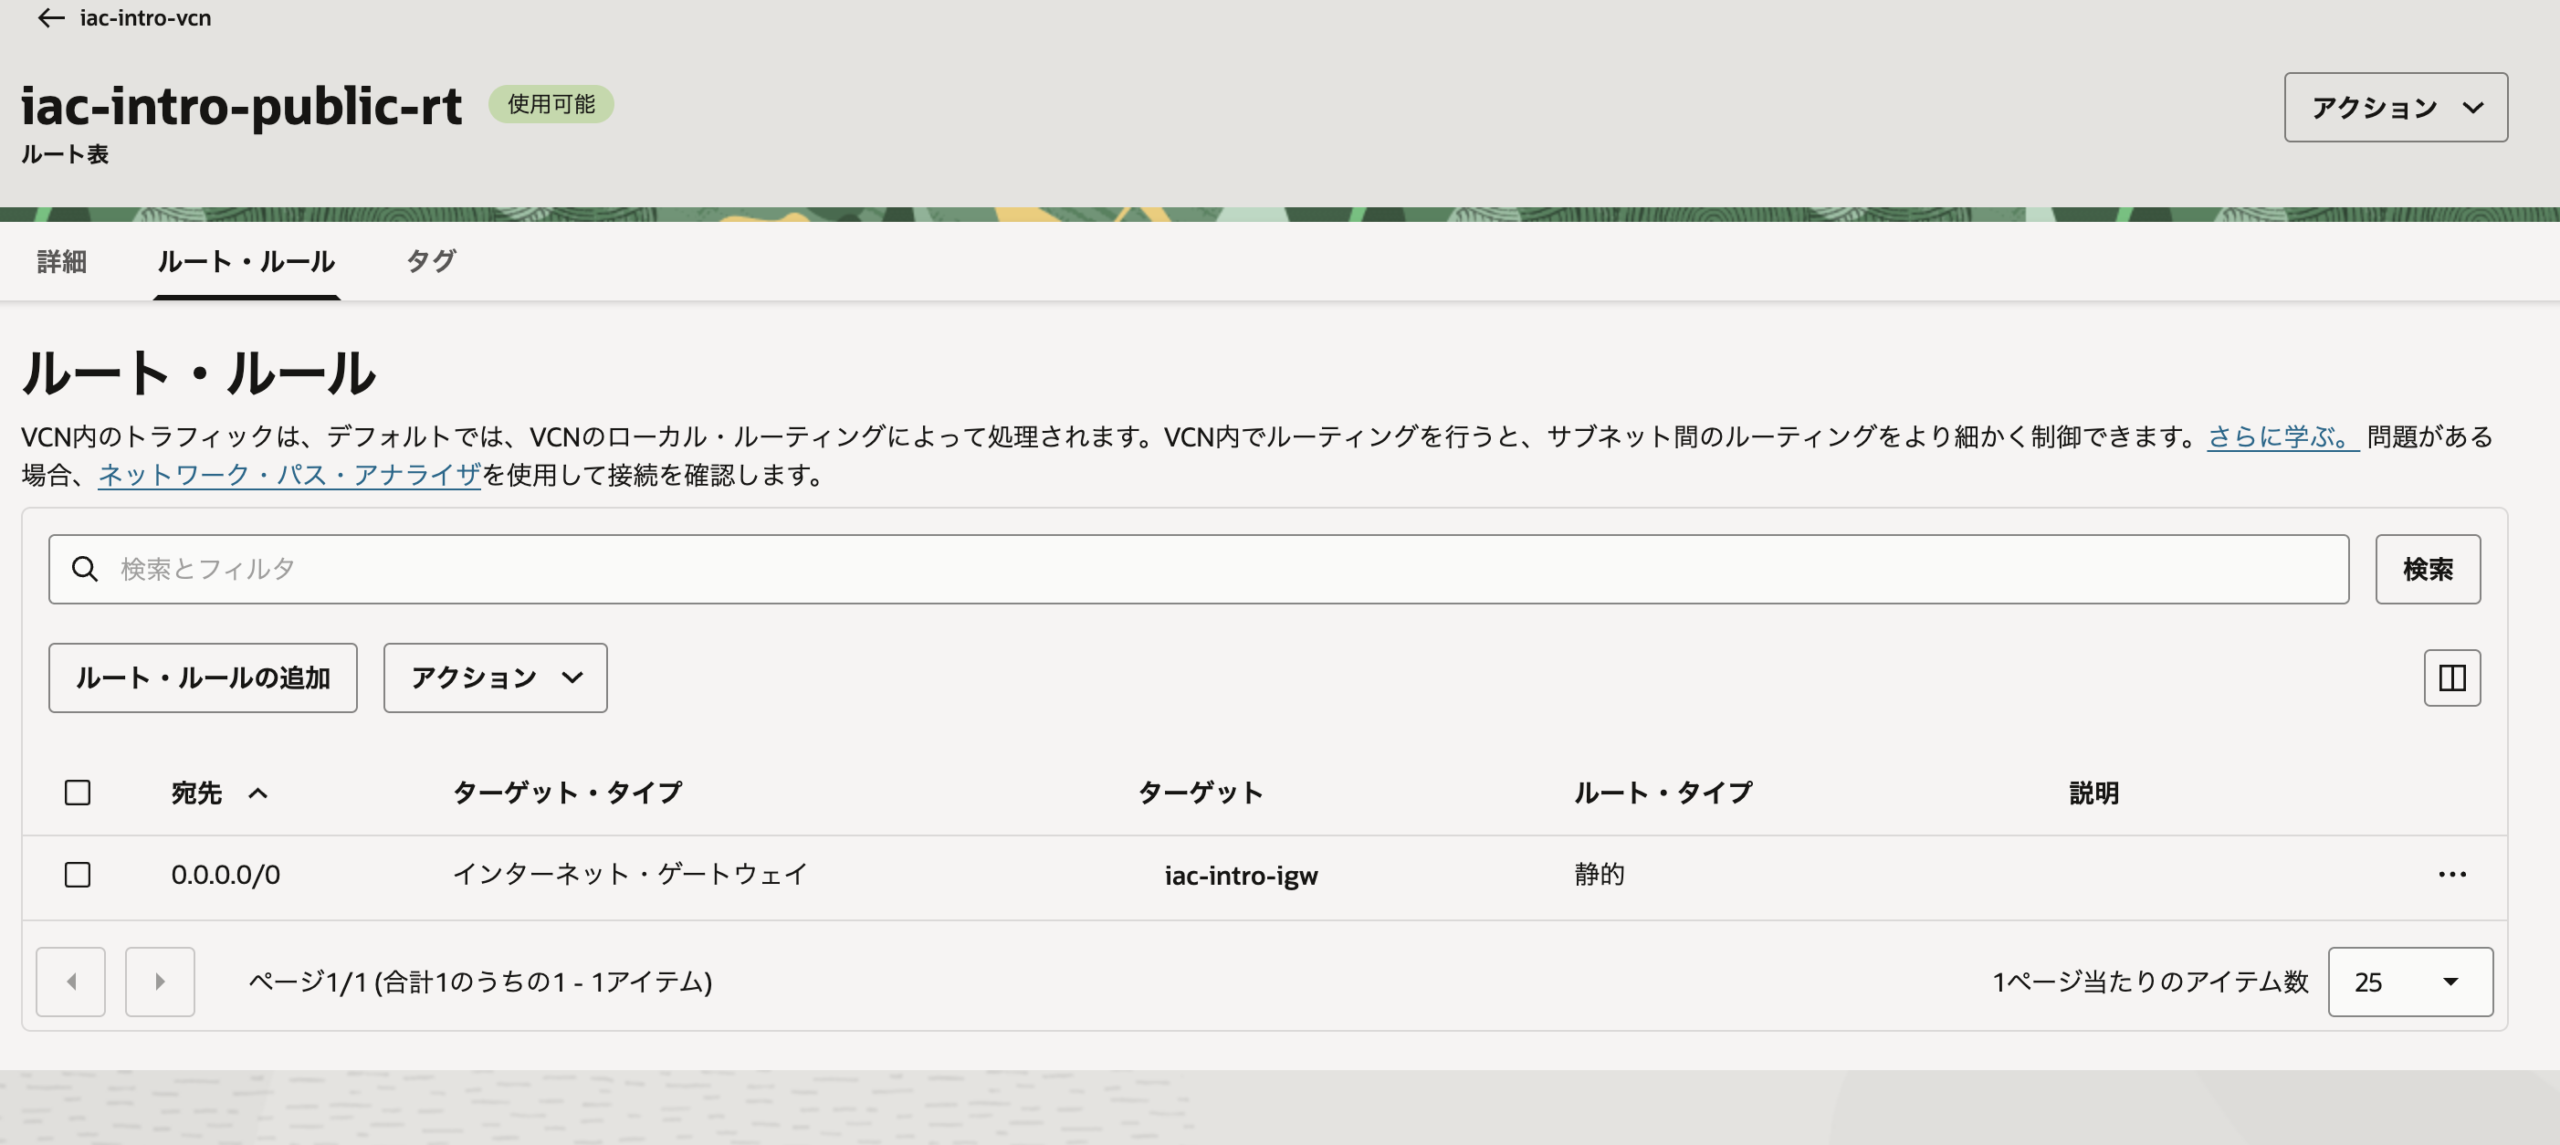
図6 ルート表 iac-intro-public-rt のルート・ルール
セキュリティ・リスト
セキュリティ・リスト iac-intro-public-sl の「セキュリティ・ルール」タブを開くと、入ってくる通信(イングレス・ルール)に SSH(22番)と HTTP(80番)の2つ、出ていく通信(エグレス・ルール)にすべての通信を許すルールが1つあります。SSH の接続元は伏せています。
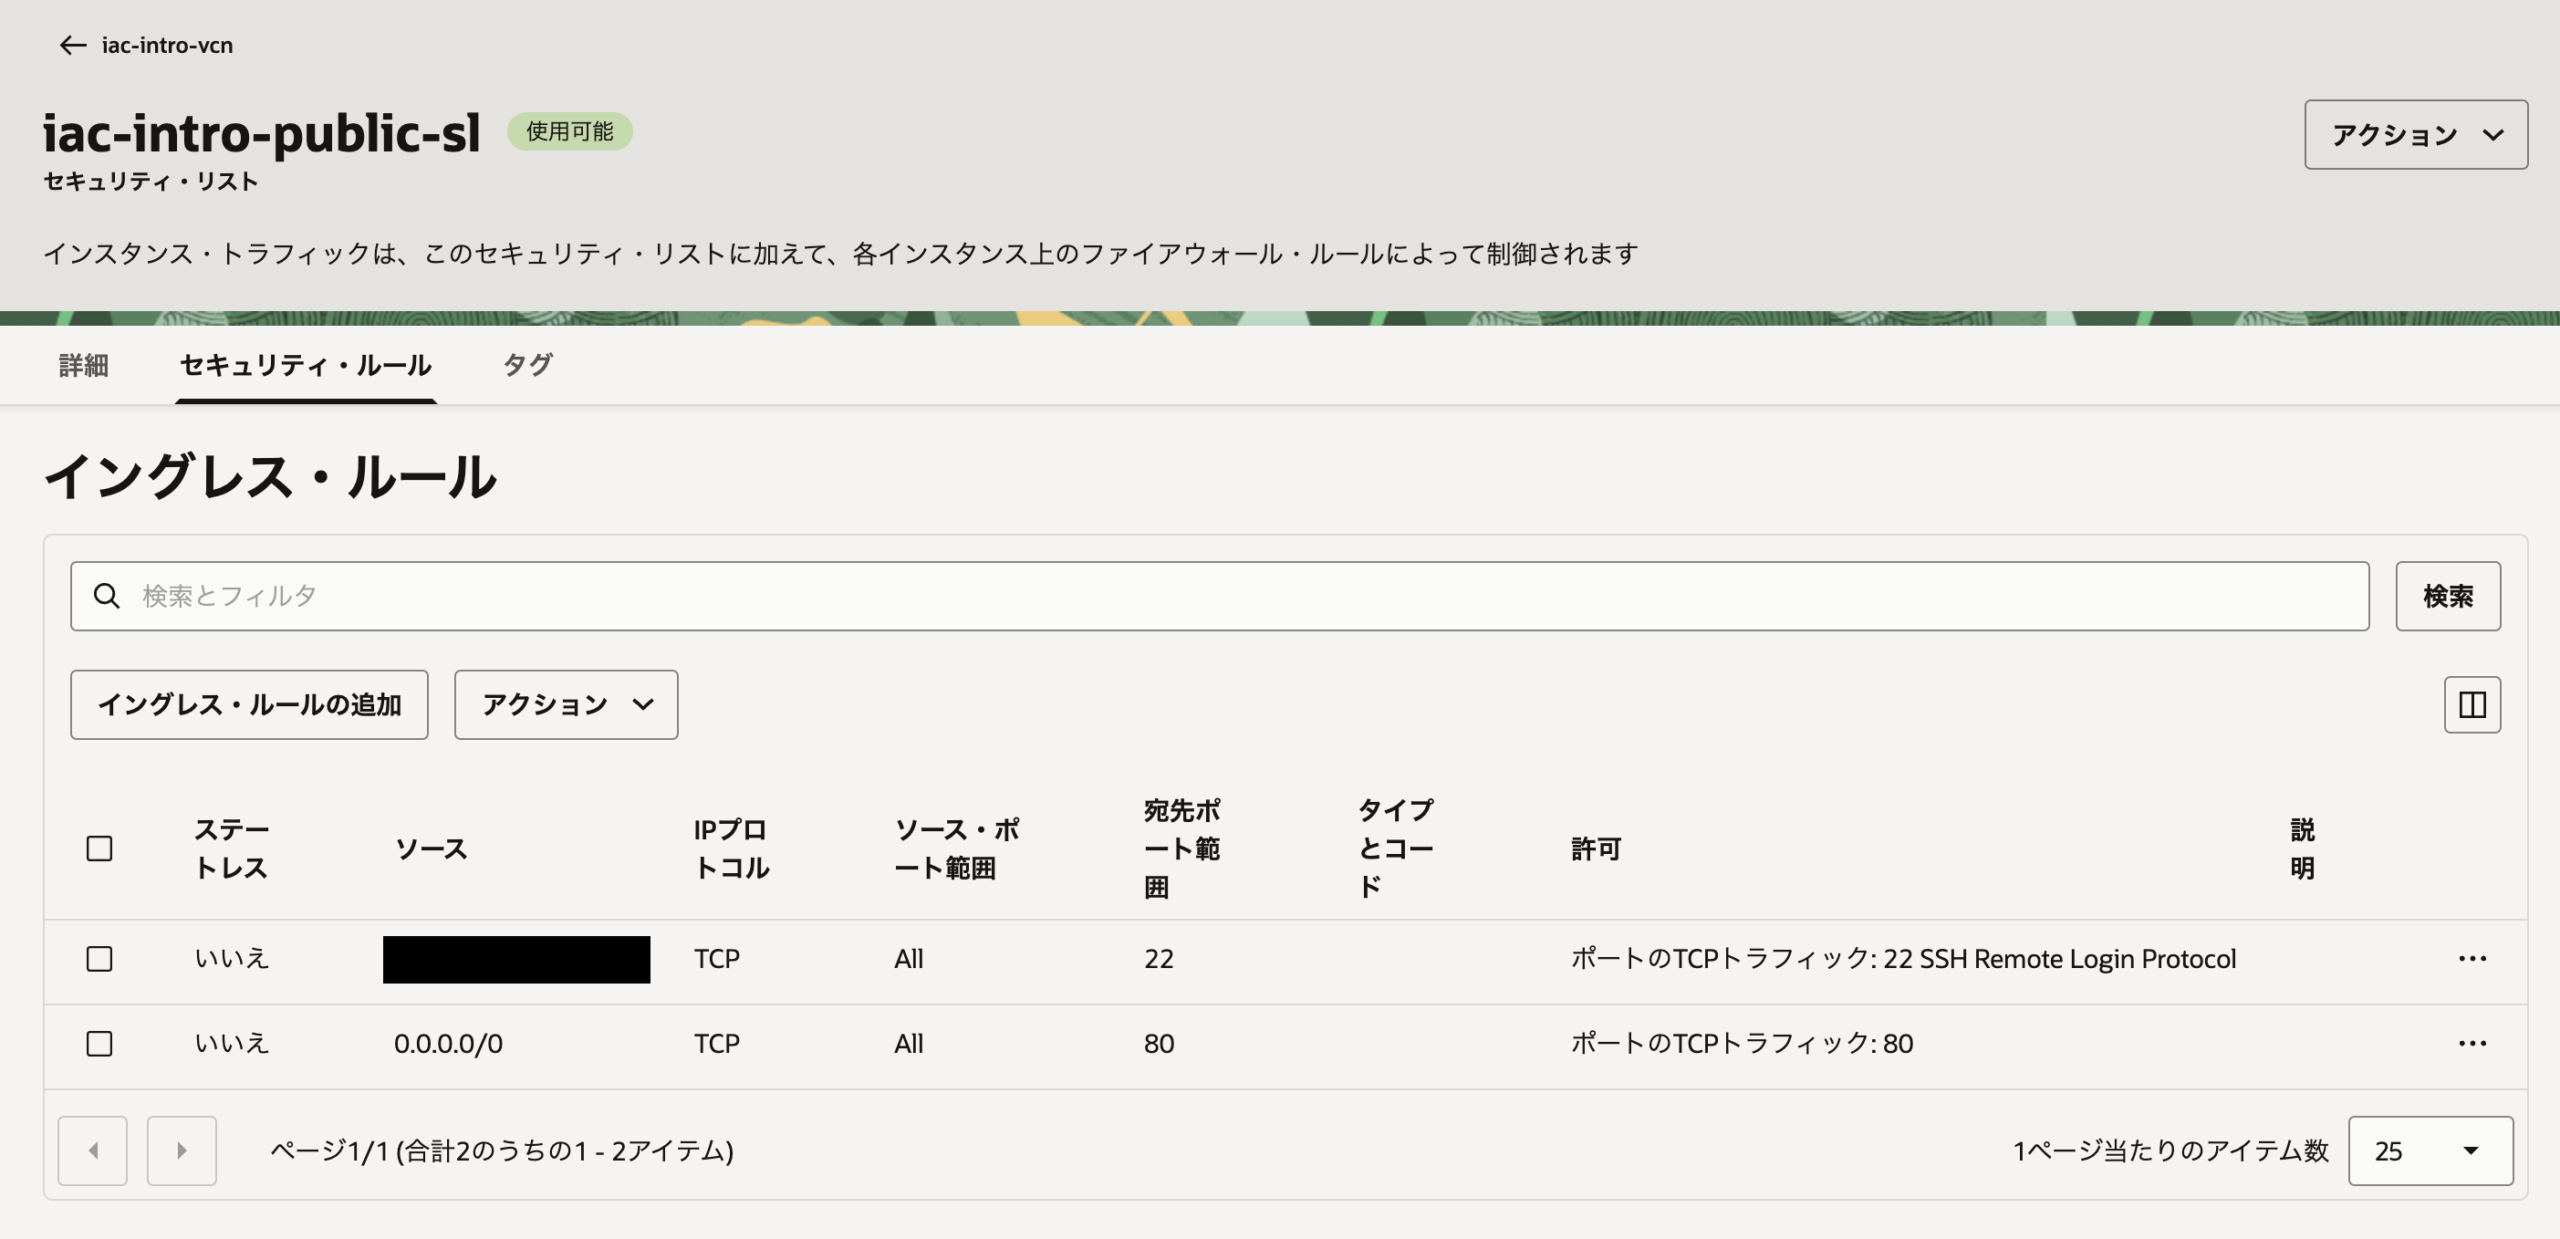
図7 セキュリティ・リストのイングレス・ルール
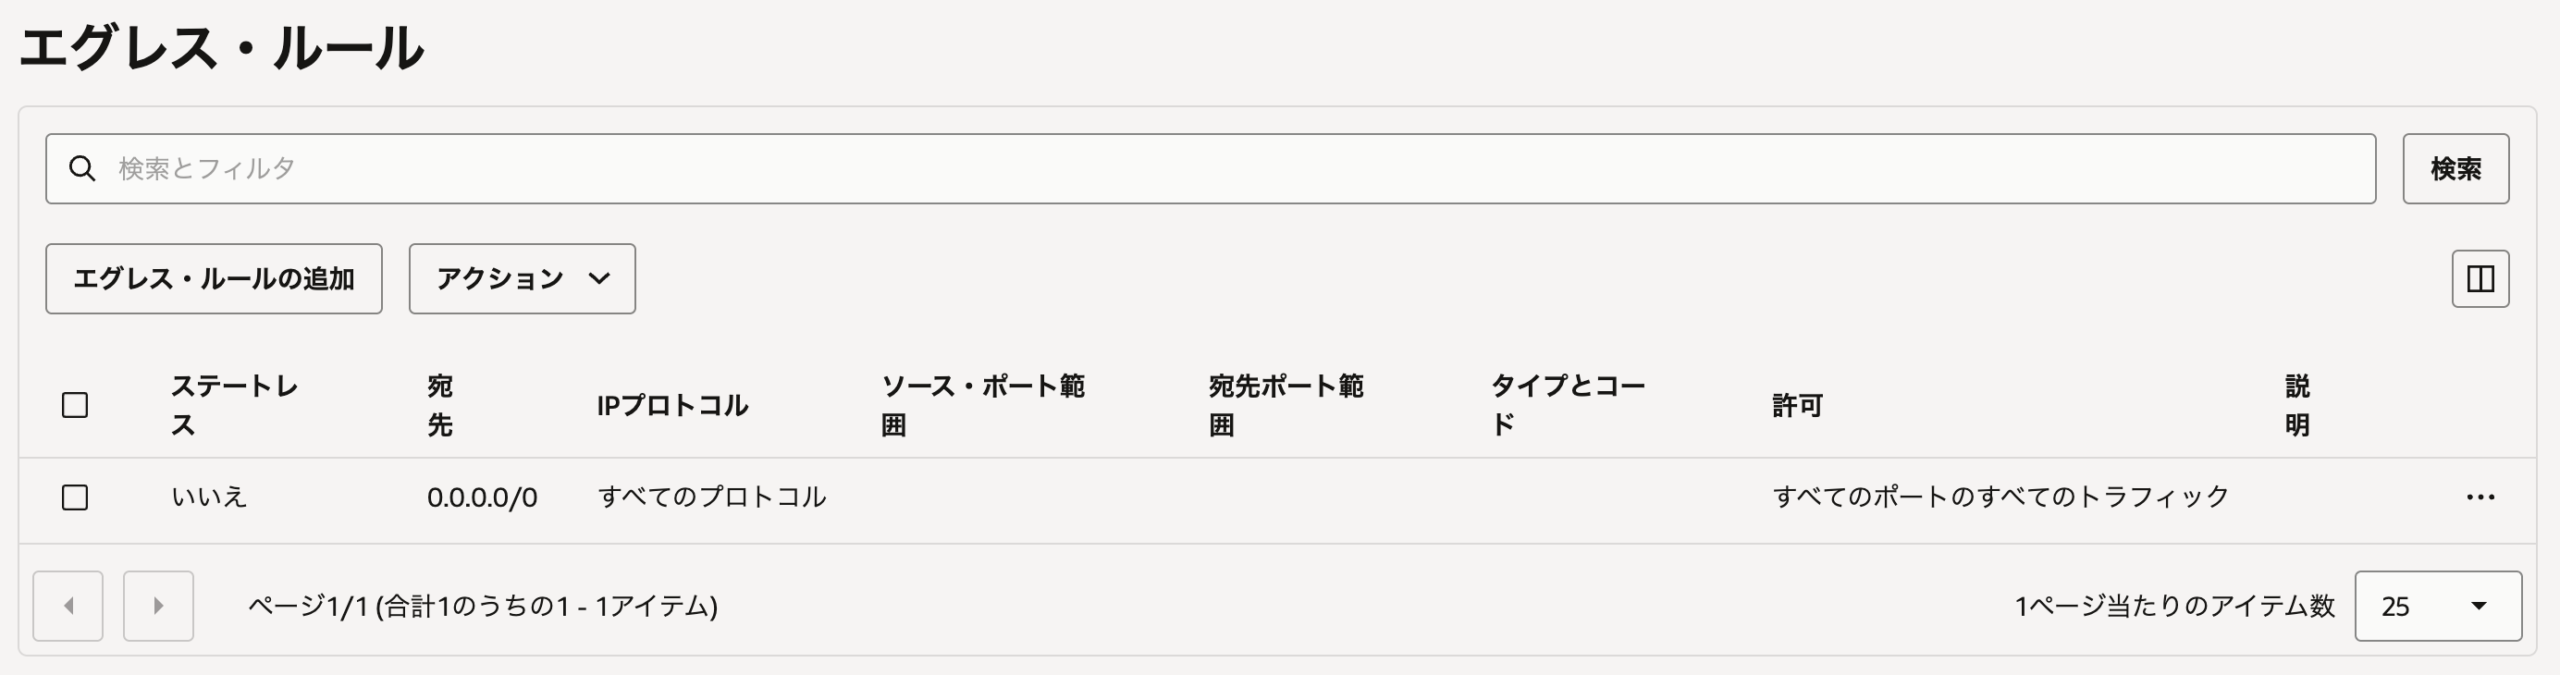
図8 セキュリティ・リストのエグレス・ルール
サブネット
VCN の「サブネット」タブを開くと、iac-intro-public-subnet ができていて、状態は「使用可能」、IPv4 CIDR ブロックは 10.0.1.0/24、サブネット・アクセスは「パブリック」です。
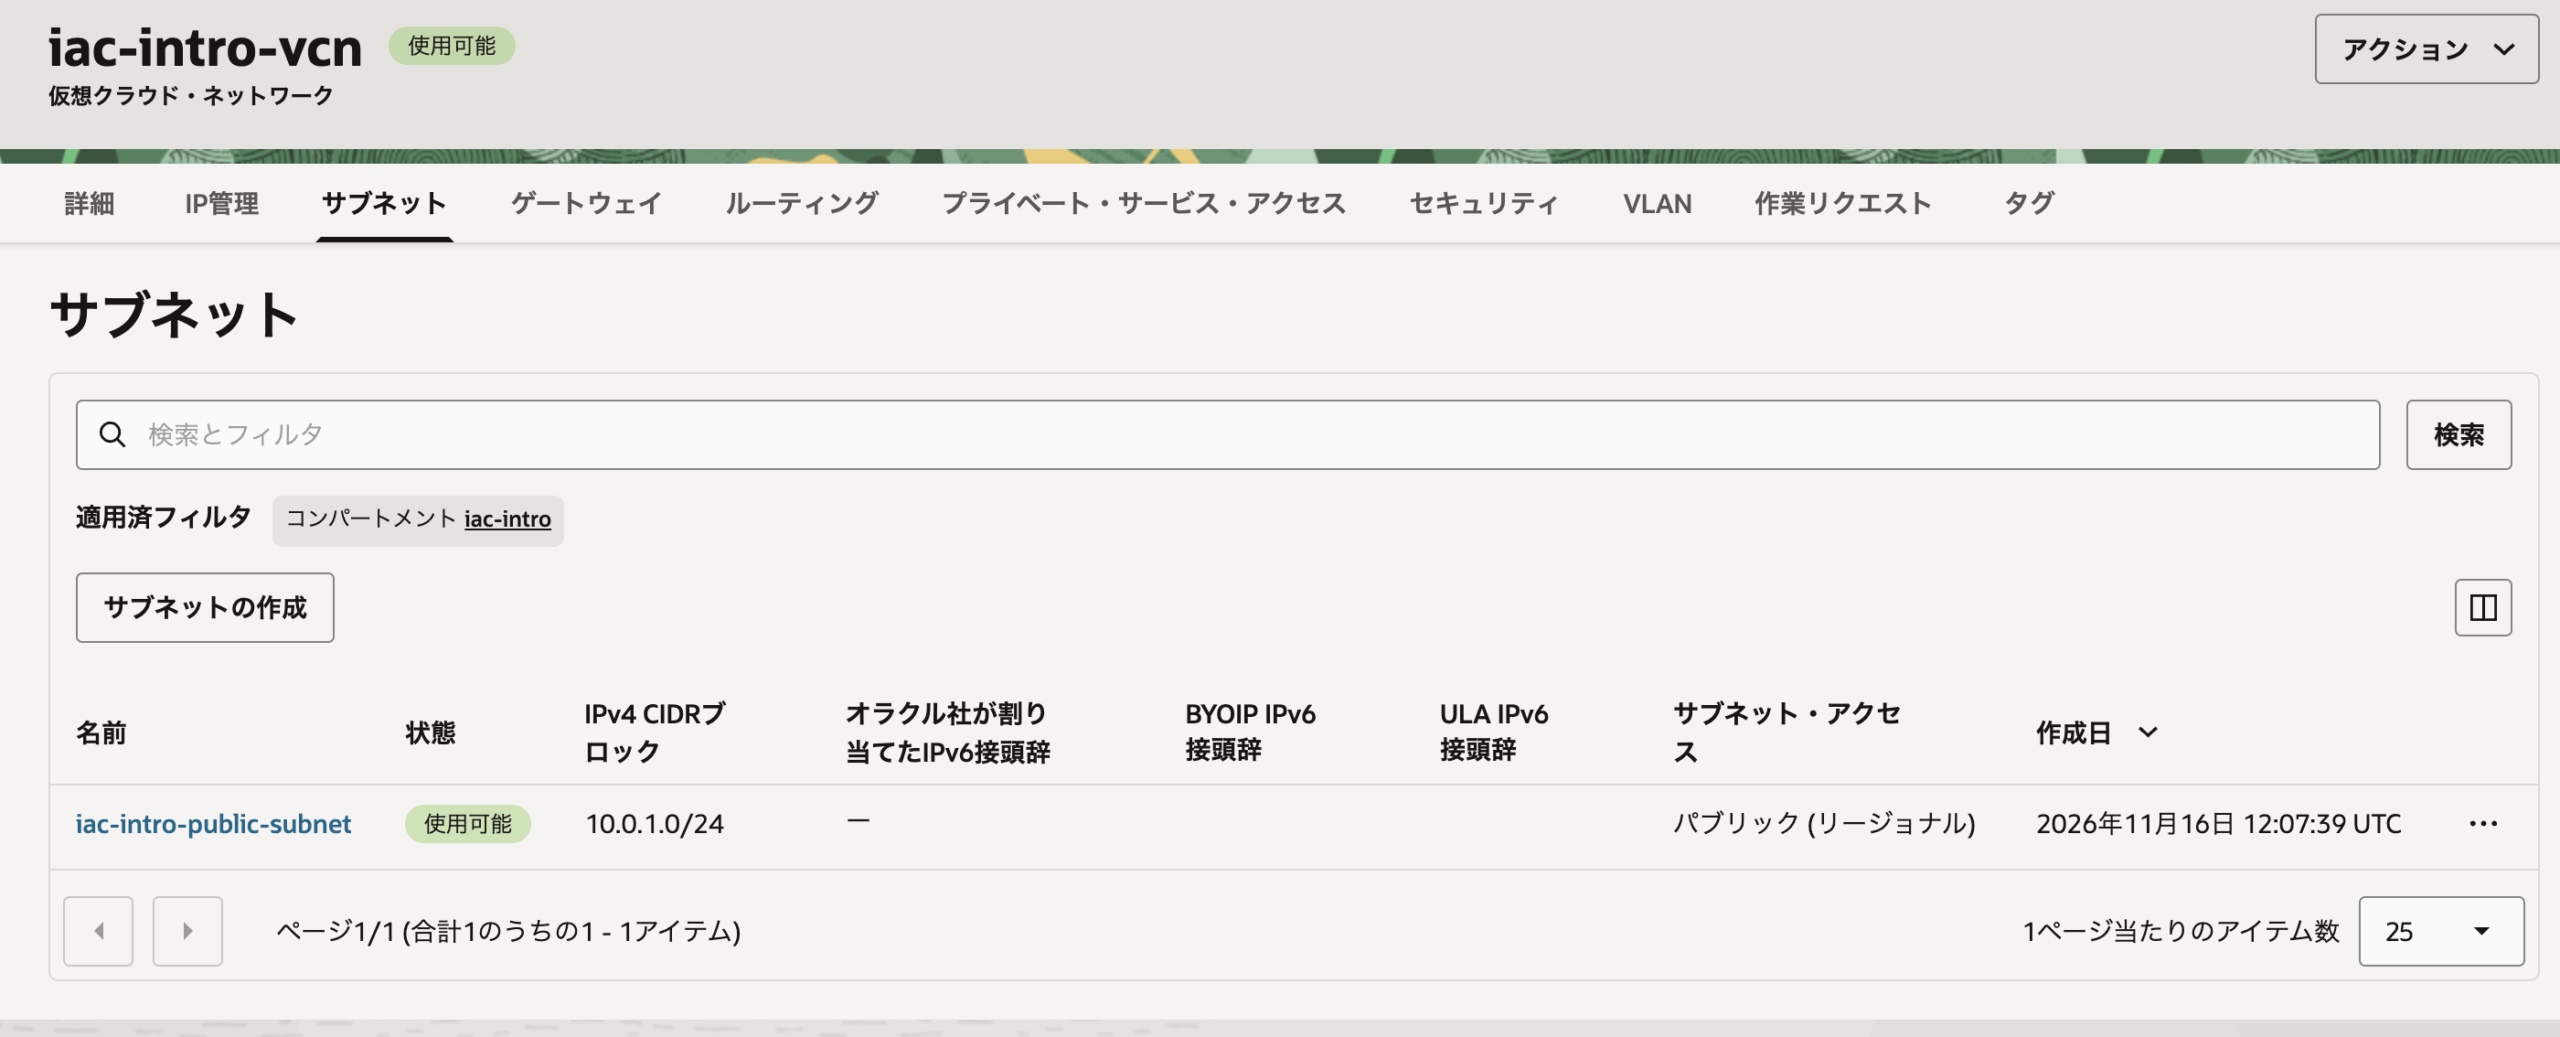
図9 サブネットの一覧
サブネット iac-intro-public-subnet の「セキュリティ」タブを開くと、コードで指定したセキュリティ・リスト iac-intro-public-sl が付いています。既定のセキュリティ・リストは付いていません。
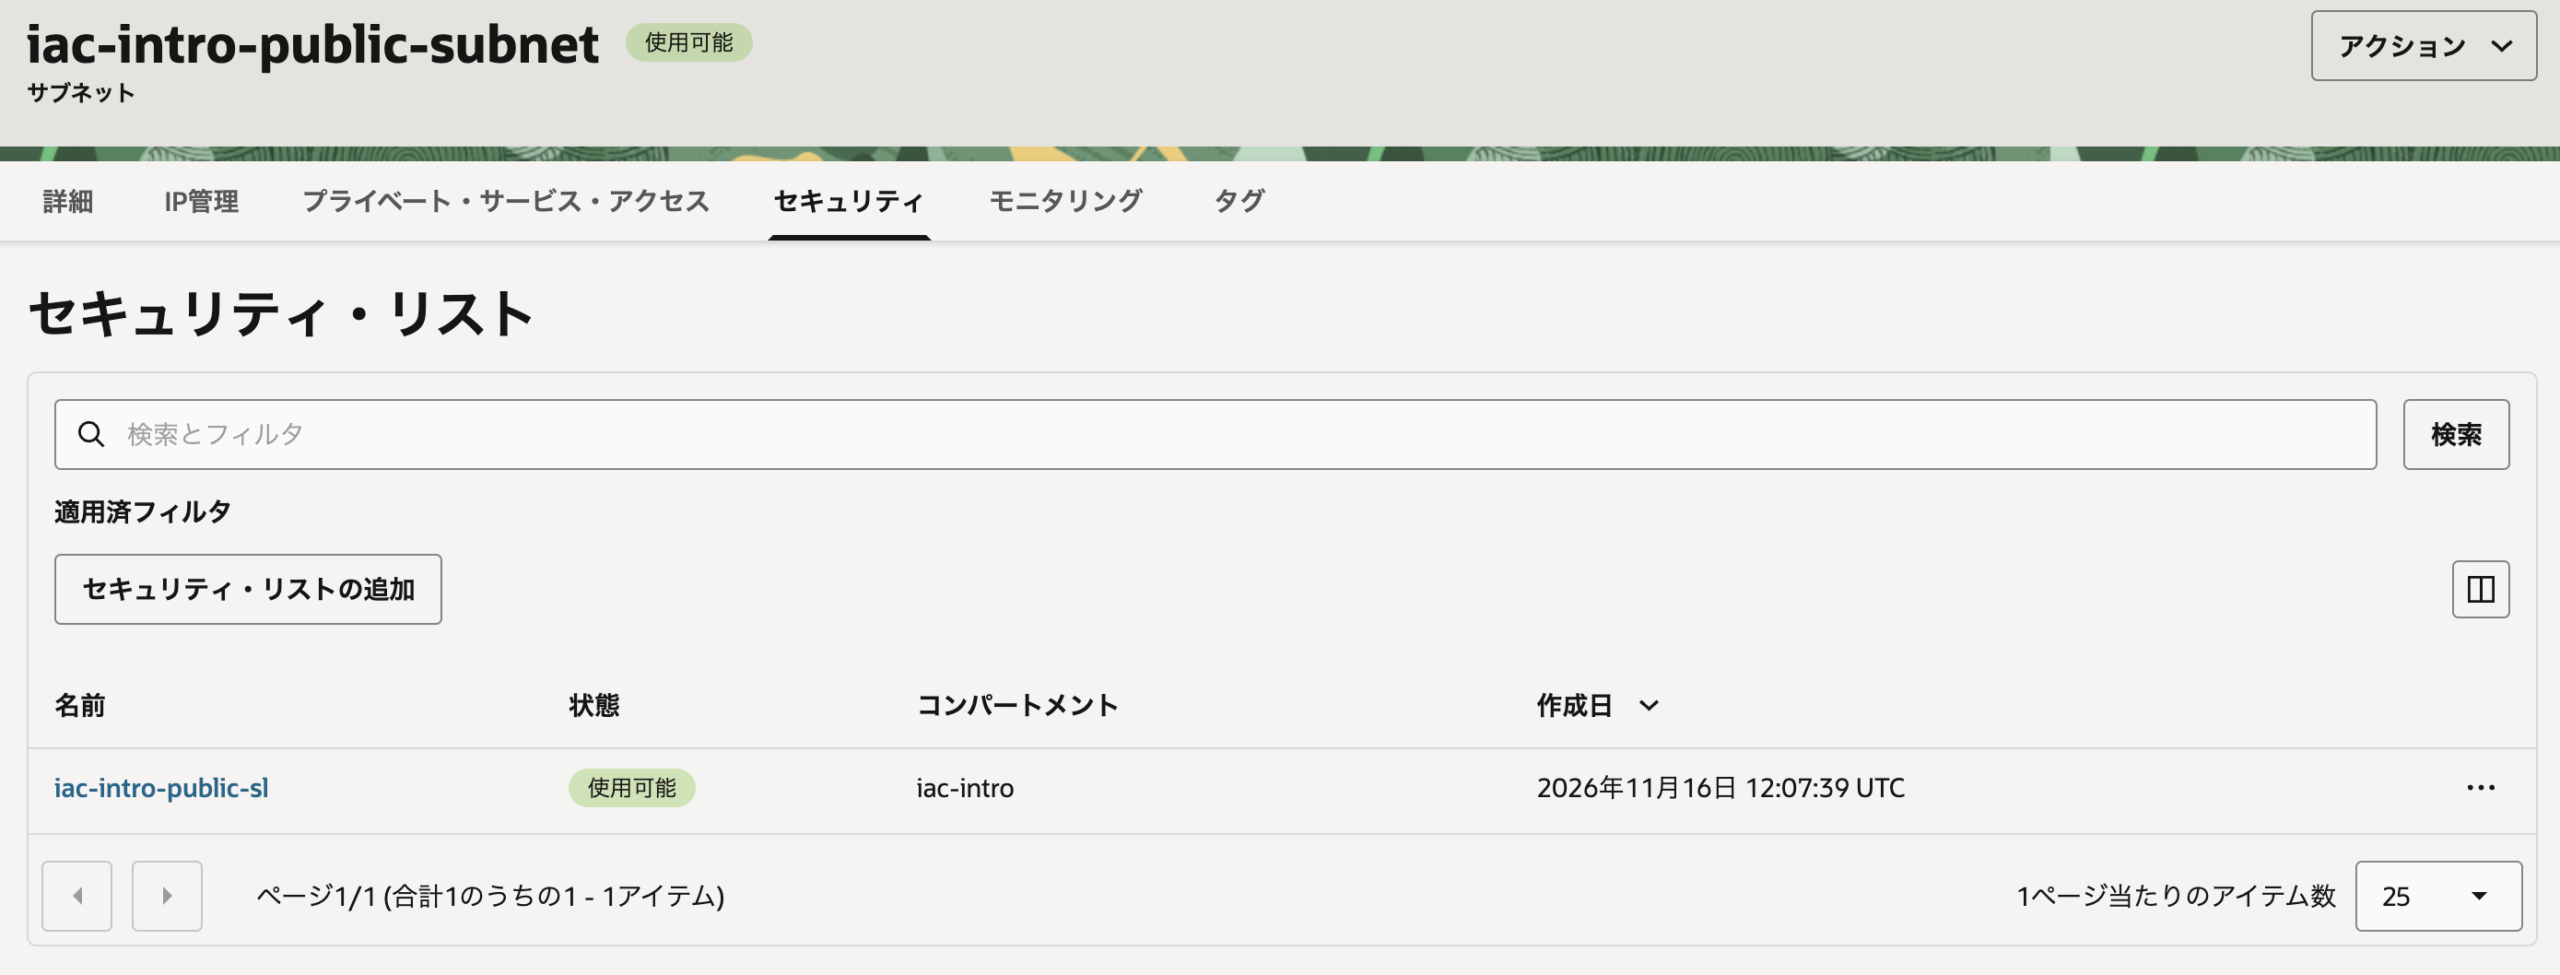
図10 サブネットに付いているセキュリティ・リスト
次回
次回は、今回作った公開用サブネットに Web サーバーとなる Compute を作ります。
この記事の手順は、OCI の公式ドキュメントと、HashiCorp の公式の解説を基にしています。